Showing posts with label Golf Course (GC). Show all posts

Saturday

Spring Hill Golf Course-Mobile, AL

This is a simple, modest golf course in Mobile, AL. The course does not try to be anything that it is not and that is quite refreshing in this day and age. The course as a whole occupies a very interesting site. Several holes are located down on perfectly flat land near a large concrete drainage canal. Those holes are not exceptionally interesting. The rest of the course plays up and down a significant hill that makes some holes play severely up or down hill. But overall, the course is simply an average golf course for an average rate, and I think that is exactly what the course tries to be.

Ranking
Variety of Design: Fair. The par 3's have reasonable variety in yardage, but the two longest holes are not very good. One plays directly uphill to a green with a 10 ft fall off in front and the other plays to a 2 ft elevated green. Not the finest set up for 210 yard holes. Par 4's have reasonable variety, but lack a really long hole and the par 5's are all roughly the same. Directionally the course has 10 holes playing straight, 4 holes playing left and 4 holes playing right. 4 1/2 out of 10

Flow of the Course: In general, the course does little to build up. Holes 7, 8 and 9 provide the best three hole stretch on the course and the overall flow would be better if those were the finishing holes. The front nine overall is rather solid but the back nine comes through not quite as good. The flow and build to a "big finish" would be better if the nines were reversed. 3 3/4 out of 10

Course Conditioning: Conditions were average, a few bare spots, few issues with drainage, but overall the conditions were fair, especially considering the price. 4 1/4 out of 10

Ease of Walking: The course is routed well. Transitions from green to tee are generally easy, the only exception being to and from hole 8 and then to and from hole 15. Both have rather large distances from the previous green to the tee and then long, uphill walks to the next tee. The hilly nature of the site also makes it no bargain. But it is certainly not the most difficult walk, not even the most difficult in town. 6 1/2 out of 10

Atmosphere: None. No significant tournament or rankings history. 1 out of 10

Total: 40 3/4 out of 100

Holes to Note
Hole #2: Par 4, 360 yards
This hole plays significantly downhill which obviously shortens the hole even more. The pond in the distance is most certainly reachable from the tee, being 275 yards from the back markers and that downhill. Players wishing to play short of the pond must contend with the fairway bunker guarding the right side of the fairway, roughly 235 yards off the tee. Playing close to the bunker gives a better angle to the green which is angled from right to left away from the player.
 The pond is visible in the distance as is the bunker. Playing close to either hazard will give benefit to the player, either a better angle or a much shorter shot.

 This is the play to the green from around 125 yards

 This shot gives an up close view of the green that is a double plateau or biarritz green, depending on your naming preference

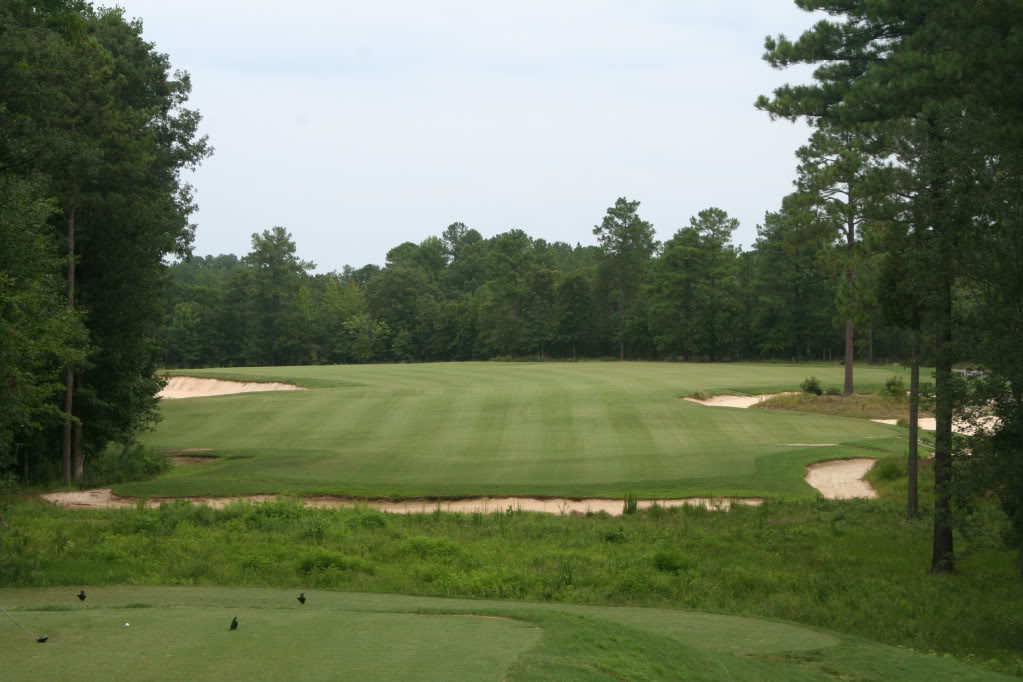
Hole #7: Par 5, 560 yards
This is the longest par 5 on the course, but it plays significantly downhill from the tee. A bunker guards the left side of the fairway, and farther left from there is a road that is out of bounds. The bunker is roughly 280 yards from the tee and certainly reachable for longer players. Longer players may wish to play a fairway wood off the tee, unless the are able to shape a fade around the corner or have confidence enough to play the tee shot over the trees on the right. From the fairway, the hole plays over a drainage canal that begins 65 yards short of the green. This canal dictates whether or not the player will try to go for the green in two or lay back to 80 or 100 yards short of the green.
 The bunker on the left is visible and certainly reachable. The ideal and semi-aggressive line off the tee would be to play towards the peak of the roof on the hospital in the distance.

 This view is from the fairway, perhaps 275 yards from the green. The fairway bunker on the left side is just short of the drainage canal.

 This look is from the right side of the fairway, 100 yards short of the green. The canal is marked by the tall grasses that run across the entire hole.

Hole #13: Par 4, 275 yards
This is a perfect example of a reachable par 4. The hole is very tight, having out of bounds down the left side and long of the green. Due to the shadows, many of the features are not visible, but a bunker defends the right side of the fairway for those players attempting to play safe off the tee, a fairway bunker down the left side protects the open side of the green and two deep bunkers defend the front of the green. This hole can be easy or quite difficult, a perfect combination for a short par 4.
 The bunkers are not visible here due to the shadows, but the green lies out in the distance on direct line with the left side of the large oak tree.

 These deep greenside bunkers protect the front of the green

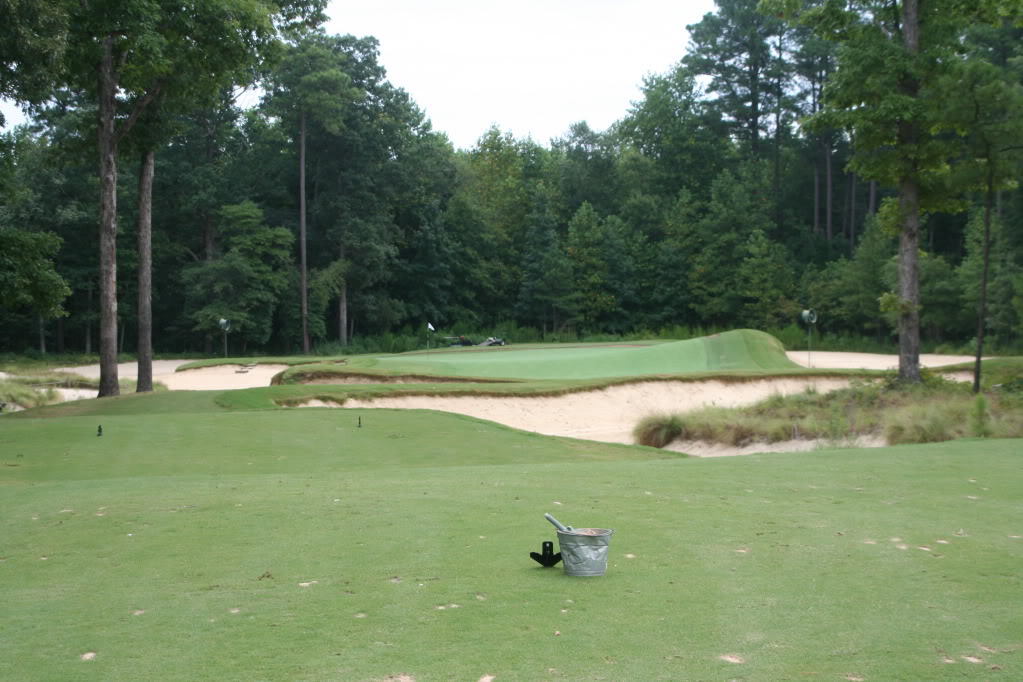
Hole #15: Par 3, 210 yards
This hole is the longest par 3 on the course, but also the worst. The hole plays significantly uphill to a green that is elevated perhaps 8 feet above the front approach area. The hole is simply not meant to be played this long. The dark green area in the center of the image indicated the front approaches and the rise can be seen.

Hole #16: Par 4, 390 yards
This mid length par 4 plays quite a bit down hill from one of the highest points on the course; the 13th green is directly behind this tee and is slightly higher, but this is the highest elevated tee. A pond down the right side provides a heavy penalty for shots hit too far right and there is a drainage creek that crosses the fairway around 50 yards short of the green. Long hitters are certainly able to reach the creek given how far downhill the hole plays. The shot to the green must be played with precision because the green falls off sharply beyond the hole and to the left. This hole gives the player a chance for birdie before two rather difficult closing holes.
 From the tee, the City of Mobile can be seen in the distance and give the player a quality view. Any shot starting right of the edge of the trees down the right will either need to hook left or get a luck break in order to stay out of the pond.
From the bottom of the hill, near the drainage creek, the green sits in front of the player, significantly elevated above the fairway.

Overall, this is a fair golf course. It's not a great course, but the operators do not try to pretend so. This is just a fair golf course for a fair price. More courses like this are needed today. 3 out of 10

Thursday

Tot Hill Farm Golf Golf Club-Asheville, NC

Tot Hill Farm is another Mike Strantz creation. Given that it is part of a housing development, it would seem as though this course was intended to be more of a member's course opposed to Tobacco Road being a resort course. As such, the course lacks some of the extreme features seen at Tobacco Road. It also lacks some of the quality architecture that Tobacco Road has. But this course is certainly above average and has enough design quality to keep even the snobbiest of golfers entertained.

Ranking
Variety of Design: Fair. Among the par 3's, the course lacks a very short hole and also lacks more than a mid-iron hole. The par 4's are all approached with short irons and the par 5's are all reachable in two shots, though in at least one case that is highly dangerous (to the golfer's scorecard). Directional variety is very good with 6 holes going left, 5 holes going straight, and 8 holes playing straight (18 can be played as dogleg left or a straight hole). 6 1/2 out of 10

Flow of the Course: Given the lack of variety, the course lacks the ability to really build to a climax. The 5th, 12th and possibly 18th holes provide high points to the round, but overall, the flow is closer to a flat line rather than a roller coaster. 6 out of 10

Conditioning: This course is among the mid to high level of courses in the Pinehurst area (though geographically it is on the far reaches, it shares a strong partnership with Tobacco Road) and conditioning is fitting. 7 out of 10

Ease of Walking: The hilly nature of the course make walking difficult and some long green to tee transitions make it more difficult still. 3 1/2 out of 10

Atmosphere: Being designed by Mike Strantz likely adds some thrill and anticipation to the course but beyond that, nothing more than the "course up the street." 3 out of 10

Total: 58

Holes to Note
Hole #1: Par 4, 448 yards
This is no easy opening hole...a Strantz feature. The playable portion of the fairway is blind from the tee, indeed the player may want to walk forward 50 yards or so in order to get a good view of the fairway. The hole is a hard dogleg left and the best play will be close down the tree line. Once in the fairway, the player can play directly over a depression short of the green or run the ball up from the right side. Solid, but potentially difficult, opening hole.

The best play hugs the tree line. The fairway on the hill in the distance is about 375 yards from the tee.

This is the view from around 180 yards. The player can either go directly over the depression and risk a pulled shot going in the creek or play a shot out to the right with a draw and roll it up on the green.

Hole #5: Par 5, 535 yards
This is a fantastic and very scenic par 5. This one fits the Macdonald template of a Cape hole. The player can play out to the left and take the safe route or aim out towards the hill/mountain in the distance and possibly left with a much shorter shot to the green. Given the yardage, the player might be within his range to go for the green in two shots, but that is very difficult. The green is surrounded with rocks and has two very distinct tiers. While being within range of long irons, the hole is clearly better approached with a very short iron.

From the tee, the scrubby depression is visible. Players can play out to the left or towards the mountain.

This is the view from the left side of the fairway after a play out to the left. The longest players can play over the larger trees to the left of the fairway from the tee.

This view of the green shows the disaster waiting on all sides. The tier is around 6 feet high. The green is surrounded with rocks and there is a sharp fall off behind the green. Approach this green with a long iron at your own risk.

Hole #9: Par 4, 371 yards
This hole is very difficult from the tee if the player uses a driver. Driver from the tee would require the player to play up the far right side and hit a fade around the corner in order to find the fairway (for the longer players). The best play is a fairway wood out to the wide part of the fairway where the signs are visible. From there, the player should be left with a short iron to a highly elevated green. 

From the tee, the player can see the fairway and is able to make his choice from there.

From position up near the forward tees, the uphill nature of the hole is clear. Players choosing to hit a driver off the tee will be left with a shot off the severe upslope. The best play from the tee is a fairway wood to position near the signs. That will give the player a mostly flat lie to the skyline green in the distance. The false front of the green is also visible.

This is the view from the fairway. The bottom of the flagstick is not visible to the player. As seen in the previous image, being long enough is critical as shots left short will roll back a significant distance off the green.

Hole #12: Par 4, 392 yards
This hole fits the Strantz template of the Fishhook (my term), but this is the only one that is a par 4. The best play is down the left near the water. From there, the player is left with a simple shot to the green.

This hole has a lot of built up rocks near the water. The best play is down the left near the water.

The green is located out on a peninsula and again surrounded by rocks. This hole is very scenic, if a bit overdone.

Hole #15: Par 3, 143 yards
This short hole is played sharply downhill to a green located in a bowl. There is also a creek fronting the green. Again, this hole is rather scenic, though a bit "busy" and perhaps a little overdone.

Hole #17: Par 4, 411 yards
As described before, this is the Template Road hole. The hole plays mid-length from the tee, likely approached with a wedge. The green butts up tight against the road in the background and has a fronting hazard. Very solid hole to bring the round to the final hole.
From the tee, the player will have the best angle to the green from the right side of the fairway. The utility pole in the distance, centered on the fairway, provides the best aiming point.

The green is shaped to deflect shots in all directions. Short shots will roll back, shots too far left will be deflected farther left, possibly down into the hazard. This is one of the best greens on the course.

Overall, this course is good, but not excellent. As seen in the images, the course gets a bit busy with rocks and other features in certain spots. 5 out of 10

Tuesday

Tobacco Road Golf Course-Sanford, NC

Mike Strantz is one of the most original designers of the past 25 years or so. In many ways, it is that originality that keeps him from being recognized in the same light as designers like Pete Dye and Tom Doak. Strantz was at his wildest and most original here. And sadly, that might have hurt the course. This course has a large number of blind or mostly blind shots, as many as 9 depending on how one counts. This has led many to characterize the course as unsafe, and it some ways, it may be. But that notwithstanding, the course is fantastic. Strategic and/or heroic options exist on nearly every hole. But too often people look at this course as something of a freak show. That is sad. While this course is not a top 100 design it is certainly in the upper crust of public courses and one that people should certainly attempt to see.

Ranking
Variety of Design: Very good. Par 3's have solid variety in the middle and lower ends of the spectrum, only lacking a long hole. Par 4's are also greatly varied, from driveable to over 450 yards. And the par 5's all have strategic interest, with holes 1 and 13 potentially being full 3 shot holes depending on manner of play. For directional variety, the course has 7 holes playing to the left, 5 holes playing to the right, and 8 holes playing straight; 1 hole can be played either straight or as dogleg left and 1 is a double-dogleg, so numbers don't add to 18. 8 out of 10

Flow of the Course: One drawback to the course's originality is that it can provide a visual overload for the player. The blind shots, massively contoured greens, hazards, and such does a bit to take away from the flow of the course. The player is at something of a high point for the entire round. It does flow from the point of view of shot types, but never builds to that "big finish." 6 1/2 out of 10

Conditioning: Good. While it was nothing spectacular, the conditioning was on the same level as the comparable courses in the area, which was very good. 7 1/2 out of 10

Ease of Walking: Difficult. The course can be walked, and the course does allow it, but it is not easy. Some of the holes are spread out, many of the holes have substantial hills, and the summer temperatures (if you decide to play during that time) are oppressive. 5 out of 10

Atmosphere: There is no country club aura here. This place is a golf club, plain and simple. There will likely be some level of anticipation for the golfer playing here, but overall, this is just an average club. 4 out of 10

Total: 67.5

Holes to Note
*Note* On this review, the holes to note will be a more detailed description of those holes mentioned as CB Macdonald Template Holes in THIS article, with two additional holes.

All images taken by and used with permission from The Buffalo Golfer

Hole #1: Par 5, 558 yards
This is the Alps hole of the course. In fact, it is something of a Double Alps hole given that the tee shot must be played over a mound to a blind fairway, as must either the second or third shot, depending on hoe one chooses to play. The large hills flanking the fairway determine play. A conservative golfer can play out to the visible fairway off the tee and then lay short of the hills on the second shot, leaving a mid-iron to the green, or he can play directly over the left hill and then play over the center of the mounds for his second shot, leaving 50 yards or so to the green. This is one of the most visually intimidating first holes you will ever play and certainly not a "gentle handshake" to start the round...more like a handshake twisted into a chokehold.

 From the tee, the player is confronted with two giant mounds. The hills in the distance are reachable from the tee for longer players. Those players must play to the left over hill to a blind fairway.

 From the center of the fairway, the player is confronted with another blind shot. From here, the player can lay short of the hills or go over them. The green is located on a line opposite the sandy area on the hill in the background.

From the left side of the fairway, the approach to the green is obscured by this set of bunkers.

Hole #2: Par 4, 377 yards
This hole bears similarity to the Road Hole template. Certainly the length is 'wrong' but the characteristics of play are quite similar. From the tee (where the shot in general resembles the Sahara), the player is given two options, play safely out to the left to the flat portion of the fairway, or play to the right, blindly over the large hills that guard that side of the fairway. Not all that dissimilar to playing over the hotel. From the fairway, the player who played to the left will be hitting a middle iron into the green, the player hitting to the right will be left with a pitching wedge or perhaps less (oddly enough, those are the same clubs used by tour pro's on the real Road Hole these days). Into the green the player is confronted with a deep scar bunker directly centered on the green waiting like a magnet to collect balls and the green is guarded long by a sharp drop-off to a bunker and brushy waste area.

 The safe line off the tee is to play a bit right of the left tee marker visible here. The aggressive line is over the right tee marker, or even a bit right of that. This is the blind Road Hole tee shot.

Into the green, the player can play a draw to the green, but must avoid the bunker centered on the green. Players going long will be confronted with a shot from a deep, vertically faced bunker.

Hole #3: Par 4, 152 yards
This green, having a mostly flat area in front, a depression in the center, and flat plateau in the rear strikingly resembles the Biarritz green complex. The length of the hole prevents the rolling approach in most cases, but that does not take away from the green having the necessary form.

The flat front level, the center depression, and the back tier can be seen here. The back is elevated slightly above the front on this green and the right side is elevated allowing balls to run back.

Hole #4: Par 5, 525 yards
This is a template hole, but not of the Macdonald School. Mike Strantz started out working for Tom Fazio. Many of Fazio's designs have this basic hole form. The Quarry, Boomerang, Fishhook (my choice), whatever you want to call it, these holes all offer the player to play two aggressive shots and reach the green in two shots. On this particular hole, the player needs to play his tee shot down the left side of the fairway in order to have a reasonable shot to the green in two shots. Then he must play his second over a sandy waste area that butts up to the green on the left side and long.

 From the tee, the shot should be played as close as possible to the bunker down the left if the player wants to go for the green in two.

This is the shot facing the player who chooses to go for the green in two shots. Not visible here is the run-up area that the player can use if playing slightly out to the right with a draw, roughly over the small bush that can be seen in the center of the image.

Hole #12: Par 4, 419 yards
The Cape hole. This hole gives the player the chance to play his shot out over the bunker down the left side as far as he wants. The fairway narrows down greatly at one point, but beyond that, there is enough room for any shot to land. The safe player can play straight down the fairway short of where it pinches in and then go to the green from there.

Standard Cape tee shot. The player can play short of where the fairway pinches at the trees, roughly 235 off the tee. The aggressive player can go left of those trees to however far left he is wishes to go. 
This is the shot to the green for the player hitting short of the trees. As you can see, the bunker gets deeper the farther left the player goes off the tee.

Hole #13: Par 5, 573 yards
This hole could be considered a Cape from the tee, but that is likely not visible to the player on the initial play. As it is, this hole is a Punchbowl due to the location of the green, though a case could be made for Alps as well. In some ways, this hole showcases everything that people find wrong with Tobacco Road. The Cape is a good hole. The Alps is a good hole. The Punchbowl is a good hole. Mixed together like they are here and it simply becomes too much for a player to take in within such a short span of time. As far as the hole goes, the simple, safe and common play is to go straight out off the tee to the large fairway, playing 220 +/- yards. The aggressive player can play out over the trees to the right at an angle of up to about 75 degrees from the front and be left with 150 yards or less to the green, assuming he hits a perfect shot. From the fairway, the player must pick a yardage to hit the second shot in order to leave himself with a preferred yardage into the green. The green is sunken inside a deep bowl and there is no possibility of a ground approach. This is not a bad hole, but it really just has too much going on, too many moving parts.

 This is the view for the player playing out straight off the tee. The fairway runs out at roughly 240 yards from here. The aggressive player can try to go over the trees on the right, as mentioned above, anything up to about 75 degrees to the right of this view will be safe if played with enough length.

 From the main fairway, the second shot should be played towards the silo in the distance. Anything left of that will be unplayable.

 This the shot to the green. Unlike most Punchbowl greens, this one is bowled off in the front. Only the short walk path keeps the green from being completely surrounded. This shot is also taken from just forward of the tee shot location for those players going over the trees.

The Punchbowl green is clearly visible in this image. It would be a better Punchbowl is the love grass around the green was removed and replaced with a standard turf grass.

Hole #18: Par 4, 432 yards
The tee shot plays over a massive sea of sand that rises up and obscures the fairway from view. The Sahara. This hole has more room than the player might think. Beyond the trees to the right, the fairway is very deep, extending perhaps 50 yards into the trees. But the best play is to favor the center of the fairway. Too far to the right will leave a significant distance to the green and too far to the left will almost certainly be a blind shot and may even be blocked out by trees. The green then gives players no easy finish being multi-tiered and sloping from front to back.
 This is the Sahara tee shot. The shot must carry the sandy waste area and the cliff. Going down the center of the opening is the preferred line. Going over the trees may leave the player a shot, depending on how far right it is, but the shot will be longer.

 This is the approach to the green. Even from the center of the fairway, the flag is obscured if placed back left like it is here.

The multi-tiered green slopes from front to back.

Overall, this is a very solid golf course. It does get a bit too extreme in spots, but typically walks the line between conservative and out-of-hand very well. Certainly this is a course that everyone should see at least once. You might love it, you might hate it, but you will certainly come out with some different thoughts on golf. 6 out of 10

Thursday

Golden Horseshoe Golf Club (Gold)-Williamsburg, VA

This older Robert Trent Jones design features many of the design ideas that made Mr. Jones famous. Aircraft Carrier/Runway tees. Solid par three's. Forcing the player to work the ball both ways. Mr. Jones takes heat in some circles due to his later work, much done by associates, but his earlier work where he was most involved is generally very high quality. That is certainly the case here.

Ranking:
Variety of Design: Very good. Great variety in yardage for all holes. Par three's range from well over 200 yards to 169 yards playing significantly downhill. Par five's from from the reachable sixth playing 485 yards to the fifteenth playing 634 yards. Par four's are also solid, ranging fron the 466 yards tenth to the 337 yard eighth. Directional variety is perfect at six right, six left, and six straight. The course also does a great job routing the course up and down the hills. The only negative is that all the par 3's play over water. 8 1/4 out of 10

Flow of the Course: This course does little to really invigorate the golfer on the front nine. The holes are solid, but there is just "something" missing. On the back, the course keeps plugging along, nothing bad, until one gets to the fifteenth tee. From there, the course builds to a very good finish. Fifteen is a very difficult long par 5, followed by a short par 3 to an island green. The view from the sixteenth tee of the green below the player and the seventeenth fairway spanning up the hill in the distance is extraordinary. From here the player is faced with two difficult par 4's to finish out the round. So the finish is top tier, but the rest of the course lacks a bit. 7 out of 10

Course Conditioning: The course was maintained very well. Played in mid-March on the winter rye overseeding, the fairways were solid throughout and not overly damp. The night before play, there had been a large rain storm pass over, but the course still played rather firm and fast. The greens were also as firm as could be expected given the rain and ran nicely fast and true. 7  1/4 out of 10, likely 1/2 point or so better in peak season

Ease of Walking: This course gets downgraded on walking due to the hilly nature of the site and also the small size of the site results in some odd transitions. But for a person of reasonable fitness, this course should not be difficult to walk. 6 out of 10

Atmosphere: Very good atmosphere here. The course is old and traditional and seeing horse drawn carriages on the way in gives it a slight boost. The reasonably high ranking of the course also does not hurt, being top 50 public according to Golf Digest. 4 1/2 out of 10

Total: 70 3/4

Holes to Note
Hole #1: Par 4, 402 yards
This hole is not an exceptionally difficult opener, but it's no cake walk either. The hole doglegs to the right and the player can choose either side of the fairway, depending on the second shot he desires. The play down the right side will leave a shorter approach over a greenside bunker while the play down the left will yeild a slightly longer shot but will open up a longer angle of the green and allow for a possible run-up shot, depending on conditions. Solid opening hole.

From the tee, the player may be tempted to go over the tall trees in the distance. While it would be possible to carry these trees, there is little value to be had in that with additional trees lining the fairway beyond that. The RTJ aircraft carrier tee is visible here.

This player chose to play down the right side for the shorter shot. The opening left of the bunker is visible and flat enough to accept running shots, should the player decide that is the best option for him.
Hole #2: Par 5, 498 yards
This hole gives the player a chance to make a birdie early in the round. 498 yards is very reachable even for modest hitters and with the hole doglegging to the right, some of that can be cut off. The best play for all golfers, going for the green in two or otherwise, is down the right side or the fairway.
From the tee, the player is again confronted by trees down the side of the fairway. The best play is to hit the tee shot as closely to them as possible and even perhaps attempt to fade the ball around the corner a bit.


In a perfect world, the golfer can end up here. This will leave roughly 200 yards to the green. As you can see, that is over water. The shot is also complicated by being played off a downhill lie. Players had better have full confidence in the shot before pulling the trigger here.
Hole #7: Par 3, 206 yards
Mr. Jones seems to have learned from his early partner, Stanley Thompson, how to work par three's into the routing. Mr. Thompson is known to have said he liked picking the par three sites first and working the course from there. That certainly seems to be what Mr. Jones did here. This is a fantastic par three playing over water, though the water should not come into play being 60 or 70 yards short of the green, to a generous green. Depending on the hole location, the player may be able to play conservatively towards the center of the green and fade or draw the ball either way in order to avoid the bunkers fronting the green.

Hole #12: Par 3, 188 yards
Another fantastic par 3. This one truly plays over the water out to a green and angles left to right away from the player. This hole simply gives the player limited options to make an aggressive play because poor execution will result in another shot over the water only slightly shorter than the one before.

Hole #15: Par 5, 634 yards
By far the longest par 5 on the course and the only one not reachable in two shots. Two bunkers flank the fairway in the landing area. From the tee, the player simply needs to hit the fairway. No attempt to the green in two shots is possible (even Bubba Watson would have great difficulty cover 634 yards in two shots) but the player will find himself at a significant disadvantage is playing his second shot from the rough. The second shot needs to be played down the right side of the fairway in order to open up the length of the green and take the green side bunkers out of play as much as possible.
From the tee, there is little that can not be seen. Simply play the tee shot down within the confines of the fairway and move along.
Obviously this player did not know how to play a shot to the fairway. From the bunker it becomes difficult to advance the ball down the fairway far enough to leave a short to mid-iron into the green.
This shot is coming into the green from the preferred angle, but from the rough. The two front greenside bunkers are visible here. This is a very difficult hole and the start to a difficult closing stretch.
Hole #16: Par 3, 169 yards
This hole is one of the earlier island green designs, being done before later designers turned the hole into a cliche. The green is large and well defended with bunkers. In truth, the bunkers likely as as much to save the player from finding the water with slight misses and hazards. This hole certainly allows the player to attempt something aggressive and make a birdie. The seventeenth hole works it's way up the hill in the center of the image below.

Hole #17: Par 4, 435 yards
From the tee, the hole does not appear to work uphill as much as was evident in the view from the sixteenth tee. The best play off the tee is up the right side of the fairway. The hills that are visible in the right side of the image below can be used as kick-slopes if the player desires. From the right side, the length of the green is open to the player. This hole will not give the player any breaks on the incoming stretch, he will need his best here.
From the tee, the green is visible in the distance and the hole looks decievingly flat. The best play is up the right, possibly using the hills to propel the tee shot forward.
From the fairway, the uphill nature of the hole is more evident. There is a small opening between the bunkers if the player wished to run the ball onto the green, but that is likely not the desired option for players who are playing the correct tees.
Hole #18: Par 4, 444 yards
The closing hole here plays level off the tee then downhill to the green and doglegs significantly to the left. The player can choose to play right or left off the tee. The play to the left will open up the length of the green, but the green is not very wide and any shot missing the green left will quite likely result in a ball in the water. Playing right off the tee leaves the player with a longer approach to the green, but gives more directional cushioning.

From the tee, the fairway spreads out in front of the player nicely. He must choose between right or left depending on what he desires to leave for his second shot.
This player chose to play down the right side. From the right-center of the fairway, the green angles away from the player left to right and the steep hill long of the green will filter balls down to the pond between the green and clubhouse. Very solid closing hole with potential for great play and disaster.
Overall, this course gets off to an average start. Though the holes themselves are very solid, there is little flow, little excitement, early in the round. However, the stellar finish makes up for that somewhat and in the end you have a very, very solid golf course here. 6 out of 10.